Merchant Portal Overview
This guide provides information for Platform Merchants about features of the portal.
Getting Started
Navigation
When you log in, you will see a vertical menu bar located on the left hand side of the page. This is referred to as the Main Menu. The Main Menu provides you with access to the various sections of the Merchant Portal that are available to you. (Depending on your setup, not all sections shown may be available.)
Dashboard
Reports
Payments
Risk
Exception Handling
Recovery
Setup
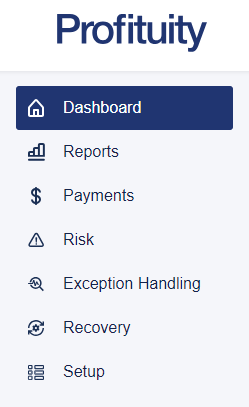
Screenshot: Main Menu
User Menu
The user menu can be accessed by clicking on the circle with your initials at the top right-hand corner of the page.
The User Menu in the Merchant Portal provides you with the following options:
User Profile - where you can go to edit your user profile or change your password.
Profituity Academy - where you can go to access our knowledgebase.
Merchant Selector - where you go to select which Merchant(s) you wish to see data for.
Log Out - click this option will log you out of the application.
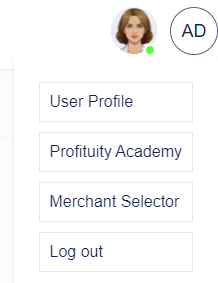
Screenshot: User Menu
Search Bar
The search bar is always available at the top left-hand side of the page, next to the logo. Refer to: How-to: Search.

Screenshot: Search Bar
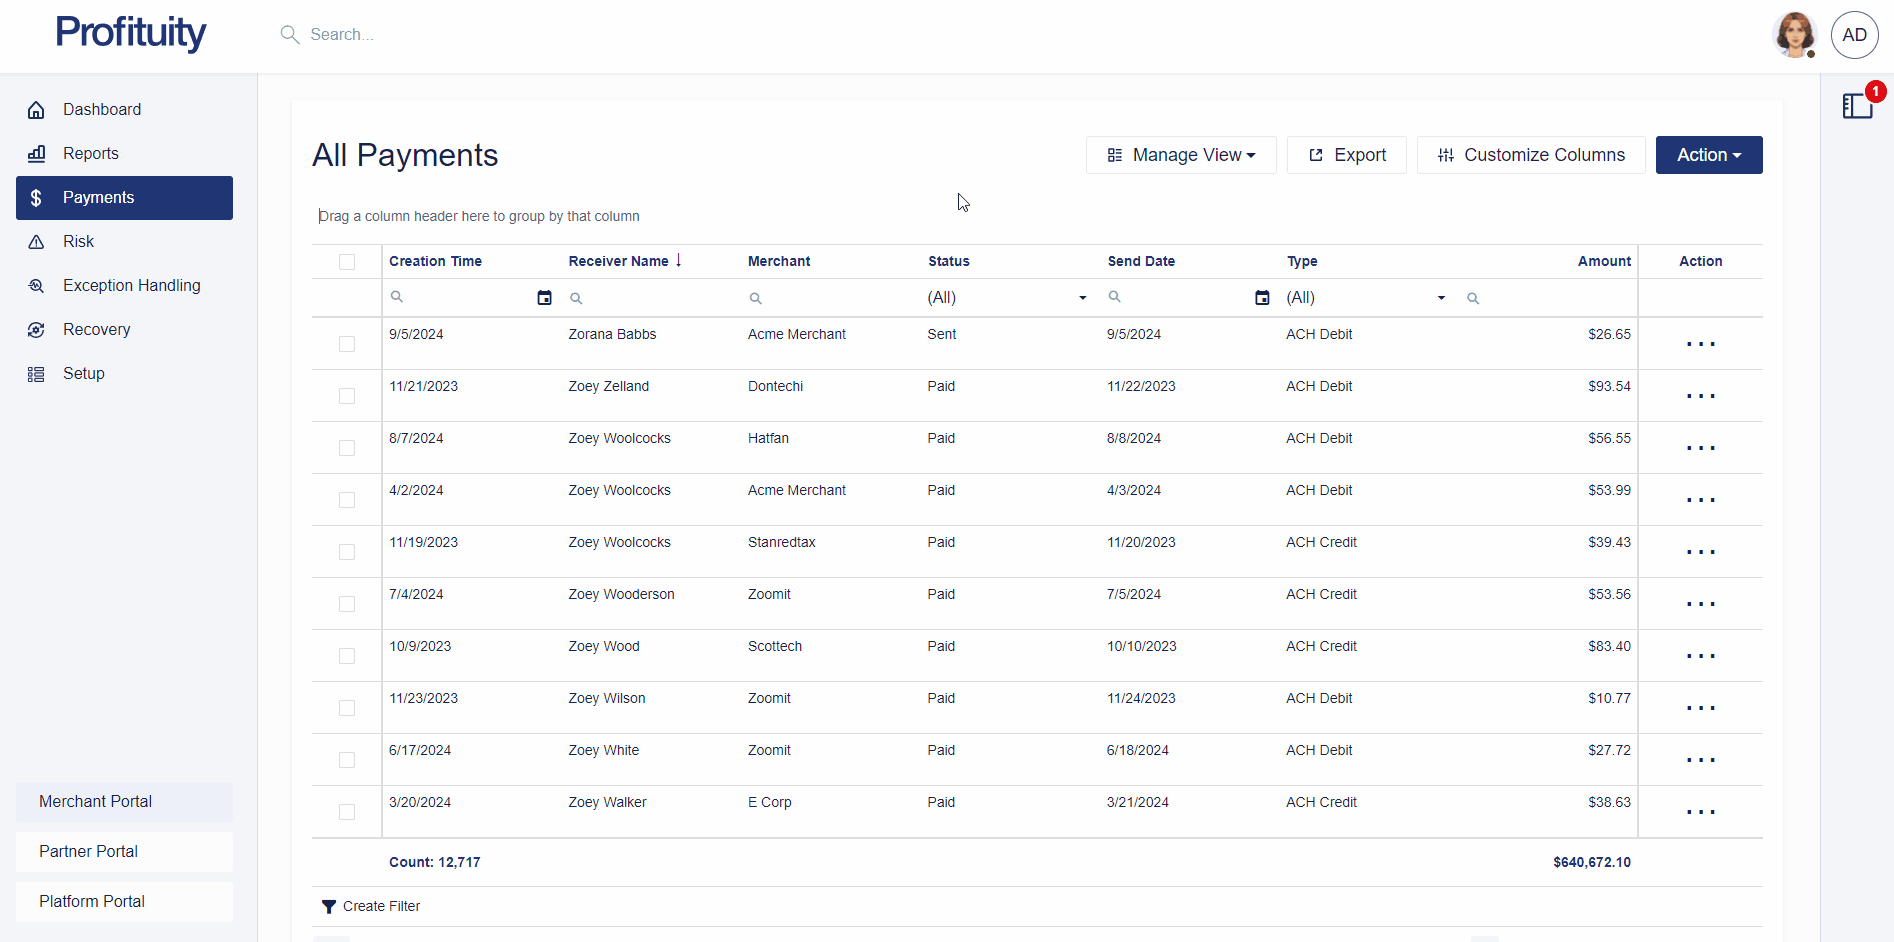
Grid Functionality
Many of the sections within the merchant portal make use of data grids (columns and rows of information) that have several elements which complement the data being viewed.
Export
Most of the grids include an export function to allow you to export the data in the grid to a variety of formats. Click the Export button located above the grid to start a download of the grid.

Screenshot: Grid Export Button
Sorting and Filtering
The information displayed in the grids can be sorted by clicking on the column headers. If your cursor changes to a hand icon, then that means the column header is sortable. When clicked, a sorting arrow will appear to show whether it is displaying the results in ascending or descending order.

Screenshot: Sorting
Please note that not all columns support sorting. For example, the Actions column (where the action button appears), does not support sorting.
Most grids include a filter row. If available, the filter row will appear directly below the header row. The filter row allows you to filter data in the grid by entering text within the cell or by selecting a value from a dropdown list.
Screenshot: Filtering
Grouping
Some of the grids allow you to apply grouping by certain columns. If grouping is supported for a given grid, then you will see the text “Drag a column header here to group by that column” above the header row. This is referred to as the Group Panel. To apply grouping, drag a column header to the Group Panel.
Please note that some columns do not support grouping (for example, Action columns are not movable).

Screenshot: Grouping
Re-arrange Columns
Most of the grids support the ability to rearrange the grid columns using drag-and-drop. To move a column, drag the column’s header to the desired position. The location in which the dragged column will be inserted after you release the left mouse button is visually indicated by two arrows.
Please note that some columns do not support re-arranging (for example, Action columns are not movable).
Screenshot: Re-arrange Columns
Customize Columns
The column chooser allows you to hide/show available columns. When you click the Customize Columns button, a Column Chooser window will appear. To hide a grid column, drag the column header to the Column Chooser window. To show a hidden column, drag the column header from the Column Chooser window to the position you want in the grid.

Screenshot: Customize Columns
Paging
Most grids include paging options, which are represented by arrow buttons and page numbers at the bottom of the grid. In addition to this, most grids also include a page size selector. This allows you to change the maximum number of records you currently want to be displayed.
Reports
The Reports section of the website is where users can go to view the built-in system reports. These reports are divided into categories based on the type of information that they show.
Accounting Reports
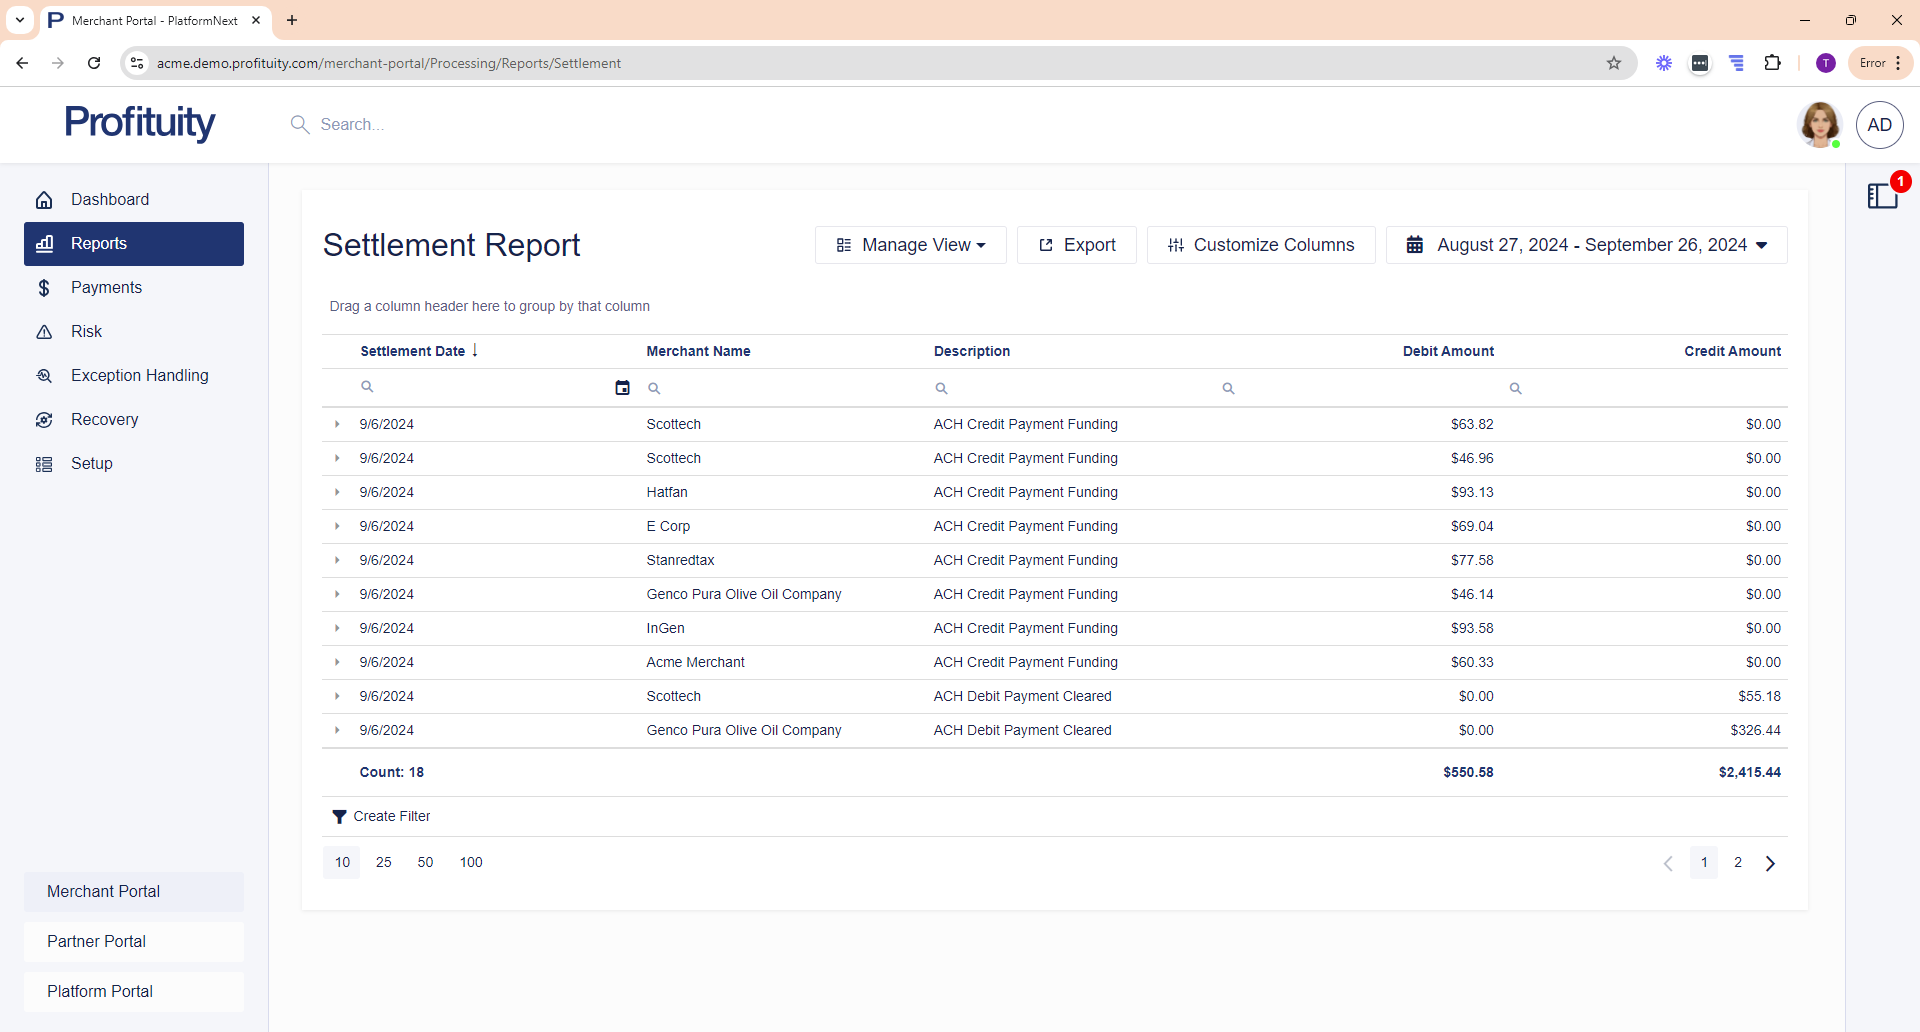
Settlement
The Settlement report shows all credit and debit transactions based on the chosen date range that have settled to the currently logged in merchants’ account(s). The settlement purpose column provides an explanation as to what the credit/debit was for.
You can click the arrow on the side to expand/collapse the details.
Screenshot: Settlement Report
Administrative Reports
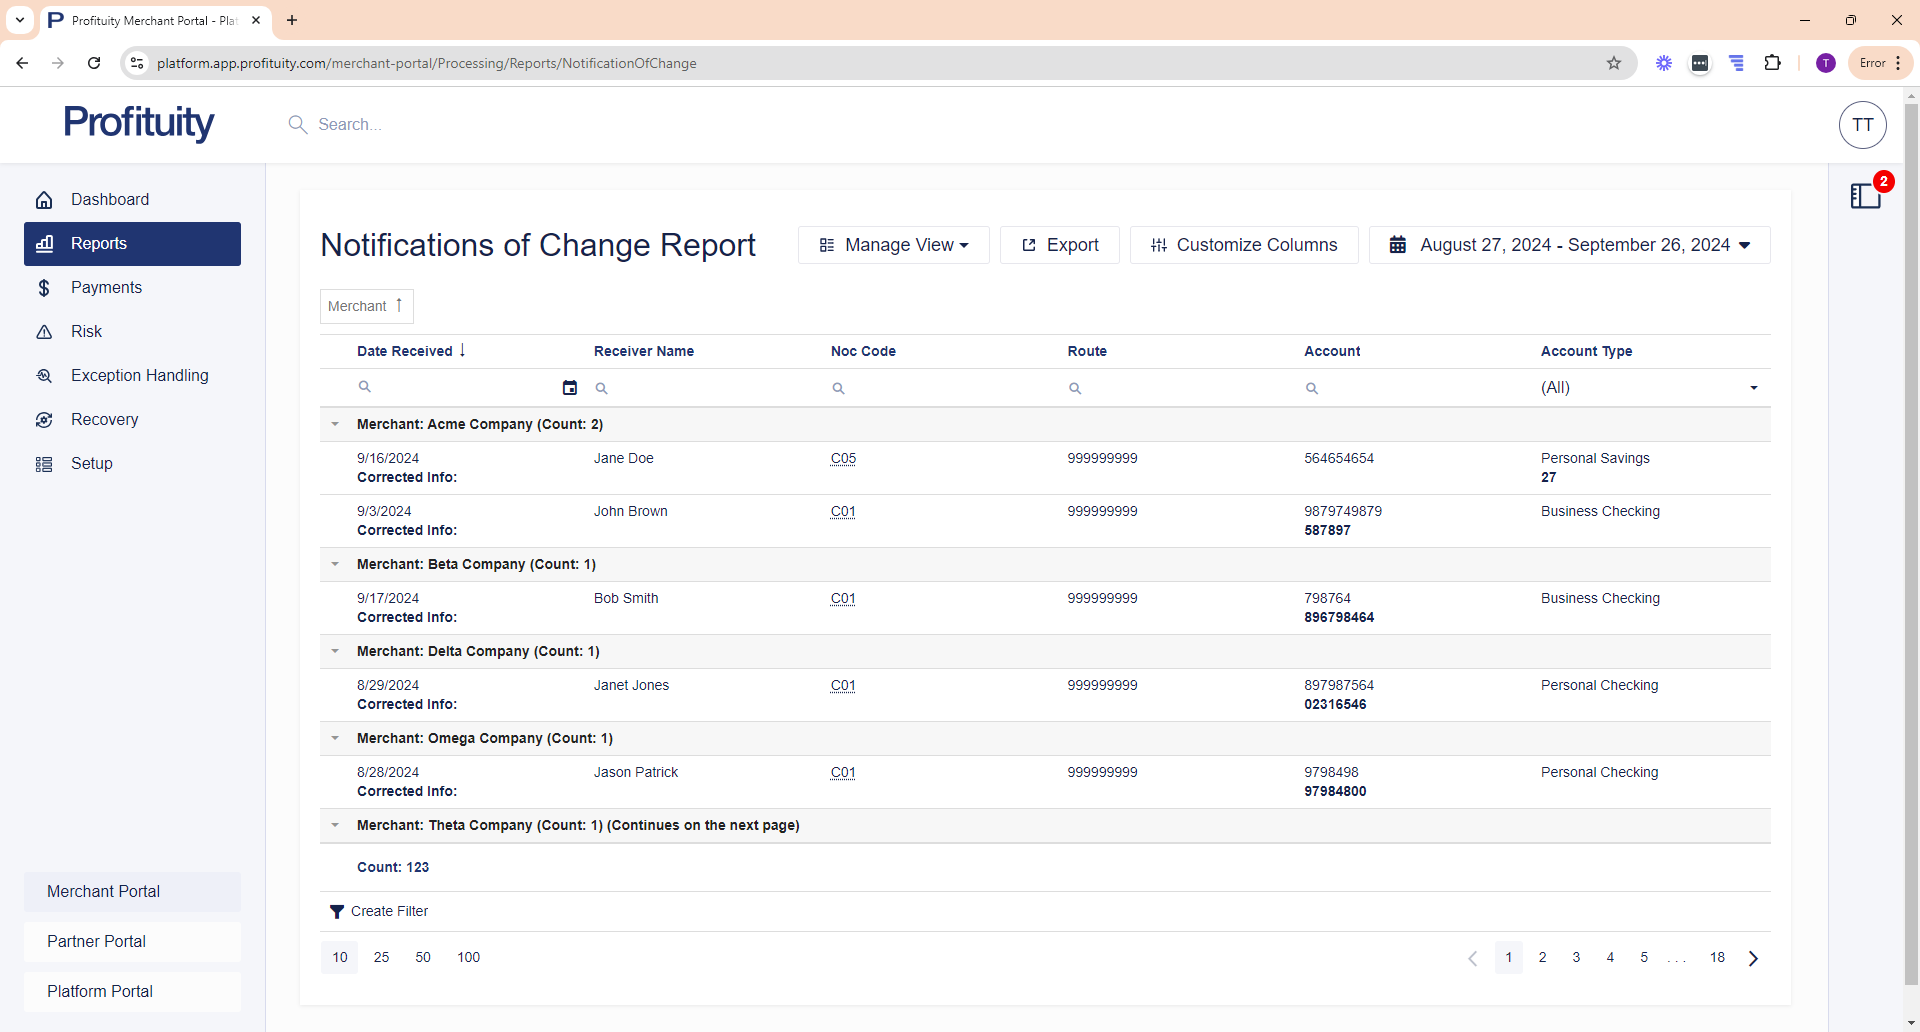
Notifications of Change
The Notification of Change report shows the most recent changes that have been requested by receiving banks. You can also change the date range to view any previous change requests.
The Corrected Info line shows you the corrections that need to be made. You can also hover over the Noc Code and it will display helper text about the code. See also: Notification of Change Codes.
Screenshot: Notifications of Change Report
If you are using other software, you will need to make changes in the software for future transactions.
Payment Reports
Payment Activity
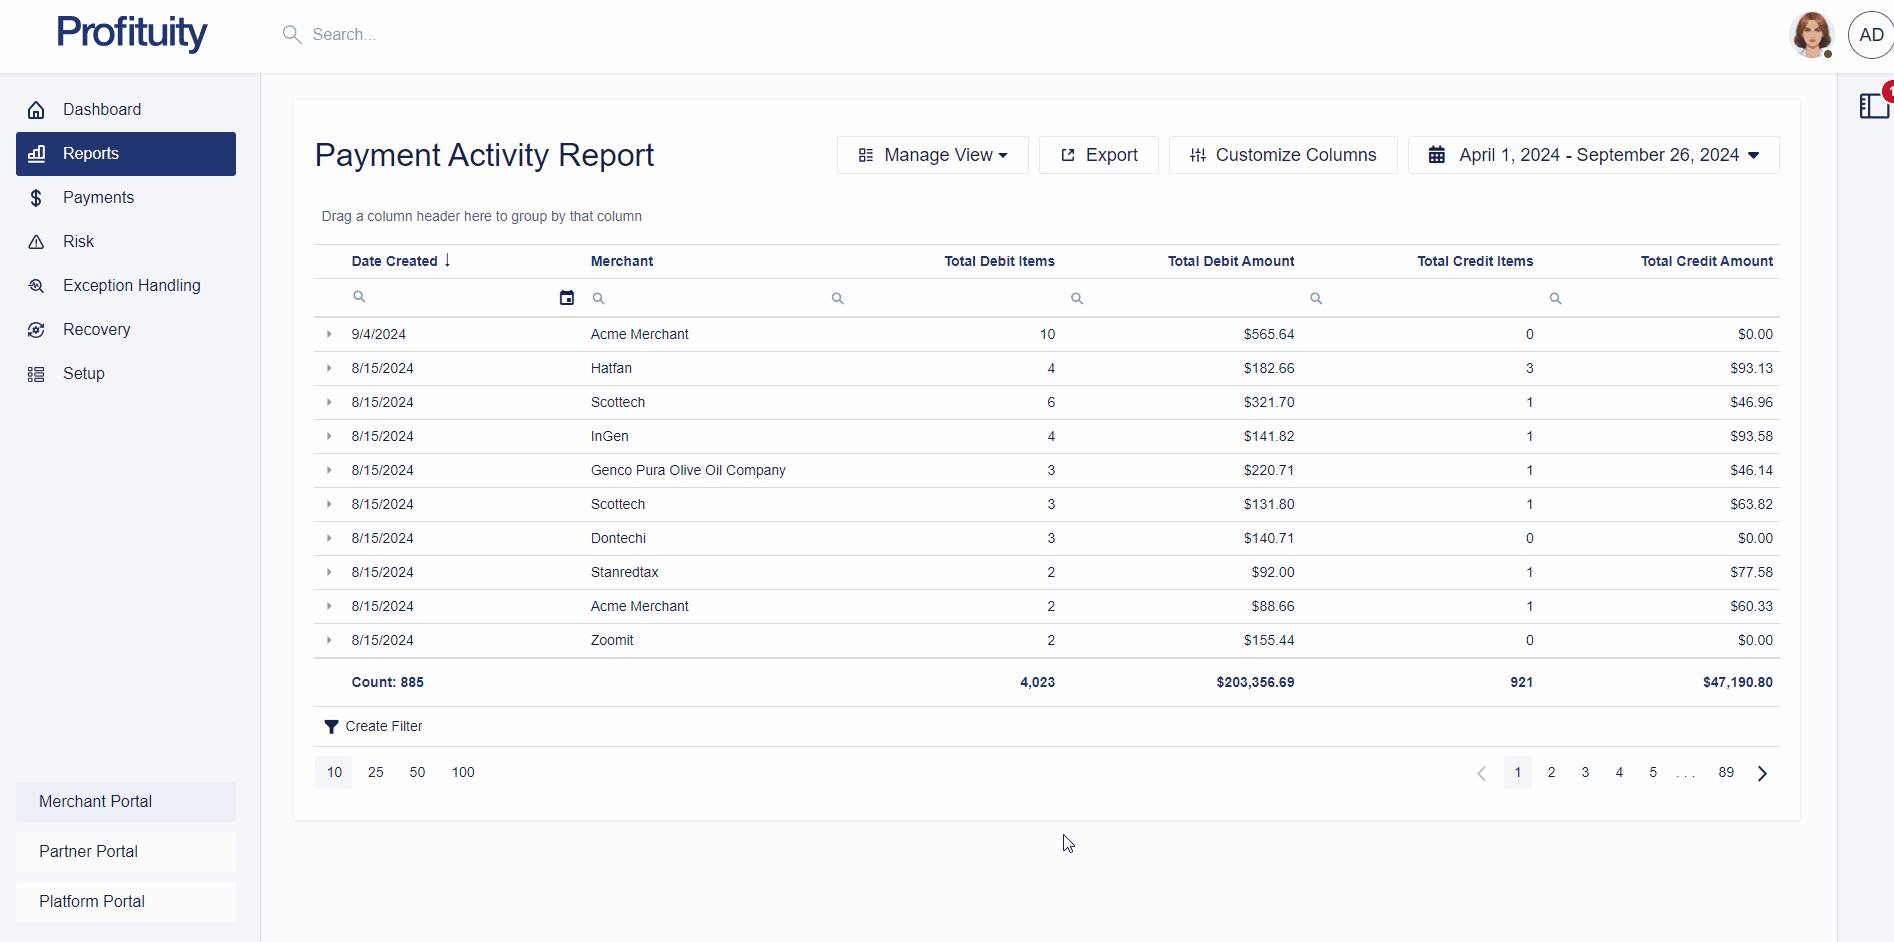
The Payment Activity report shows all submitted payment activity by date created and by Merchant during the specified time period. This report is helpful for when you are trying to reconcile against the Settlement Report as it can show you how many items paid versus returned/reversed or were rejected.
You can click the arrow on the side to expand/collapse the details.
Screenshot: Expand Detail Row
Returned Payments
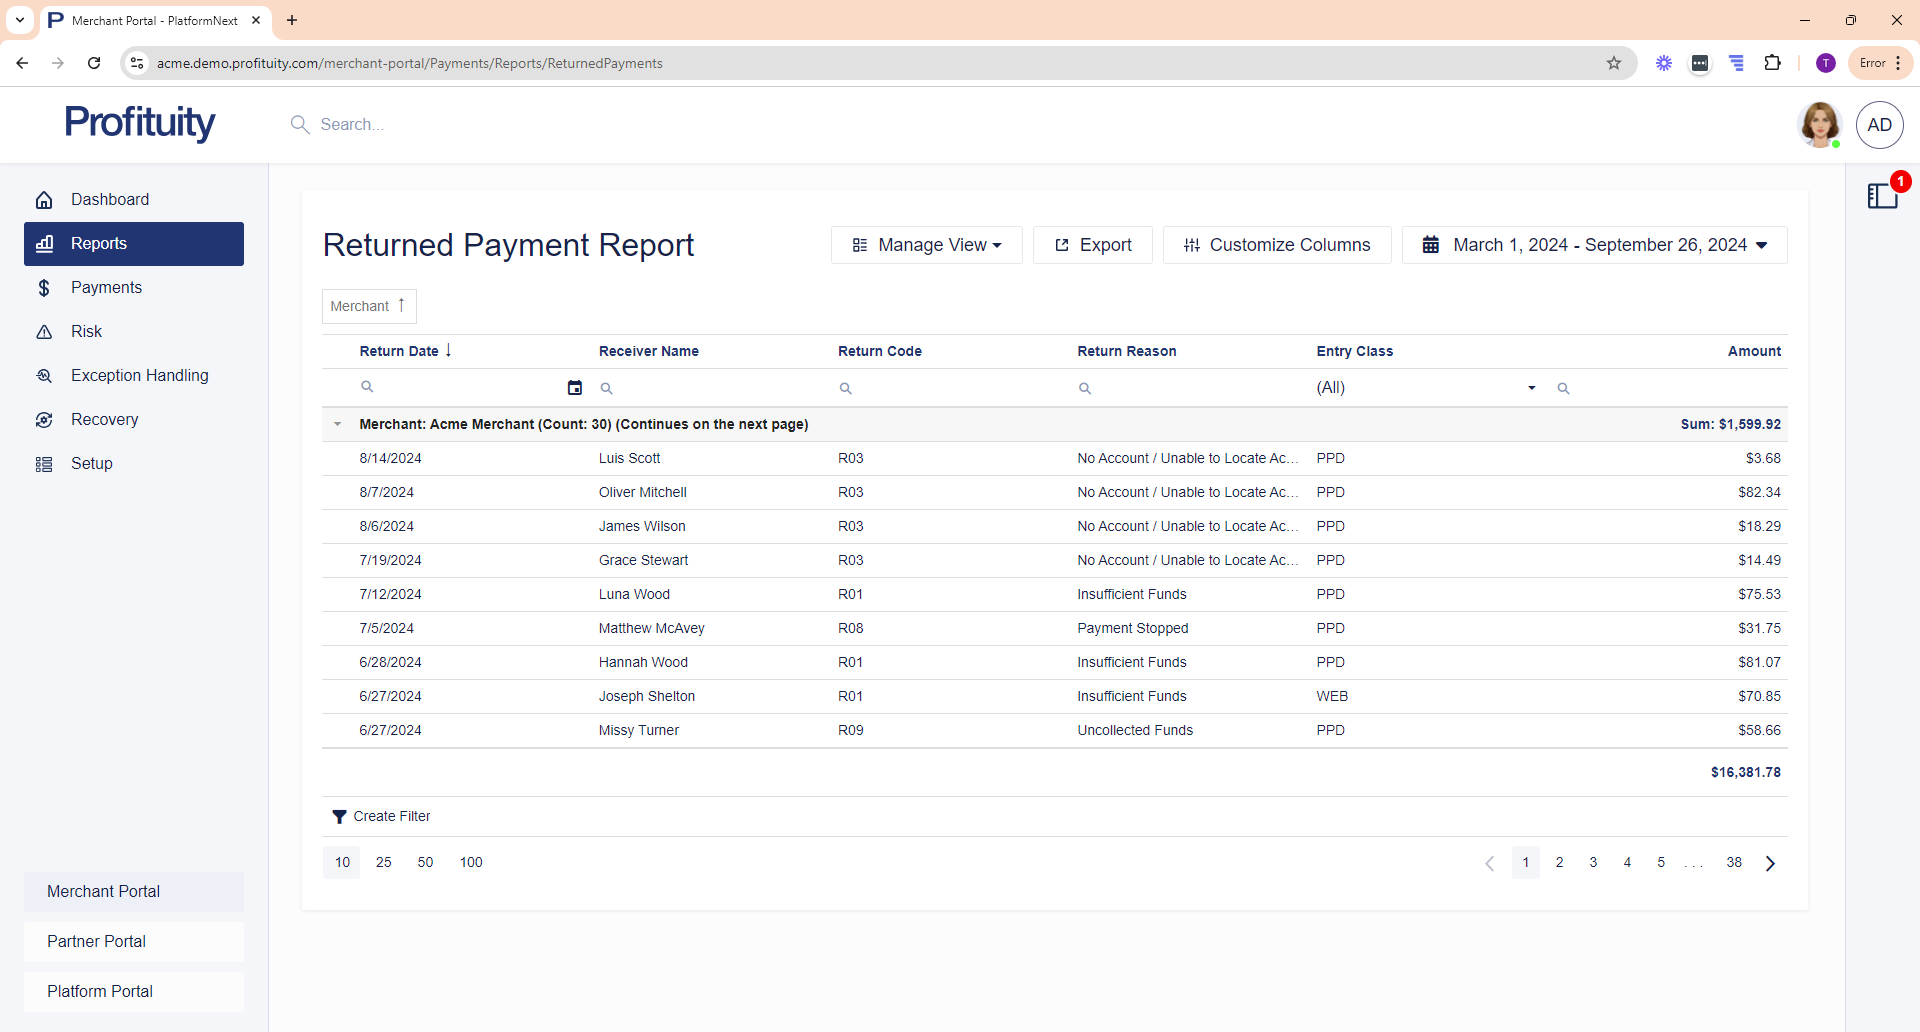
The Returned Payments report shows payments that were returned during the specified time period. See also: Return Codes.
Screenshot: Returned Payments Report
Unsuccessful Payments
The Unsuccessful Payments report shows payments that were not successful. This could be because of a return or a reversal, or because the payment was canceled, rejected, or skipped.
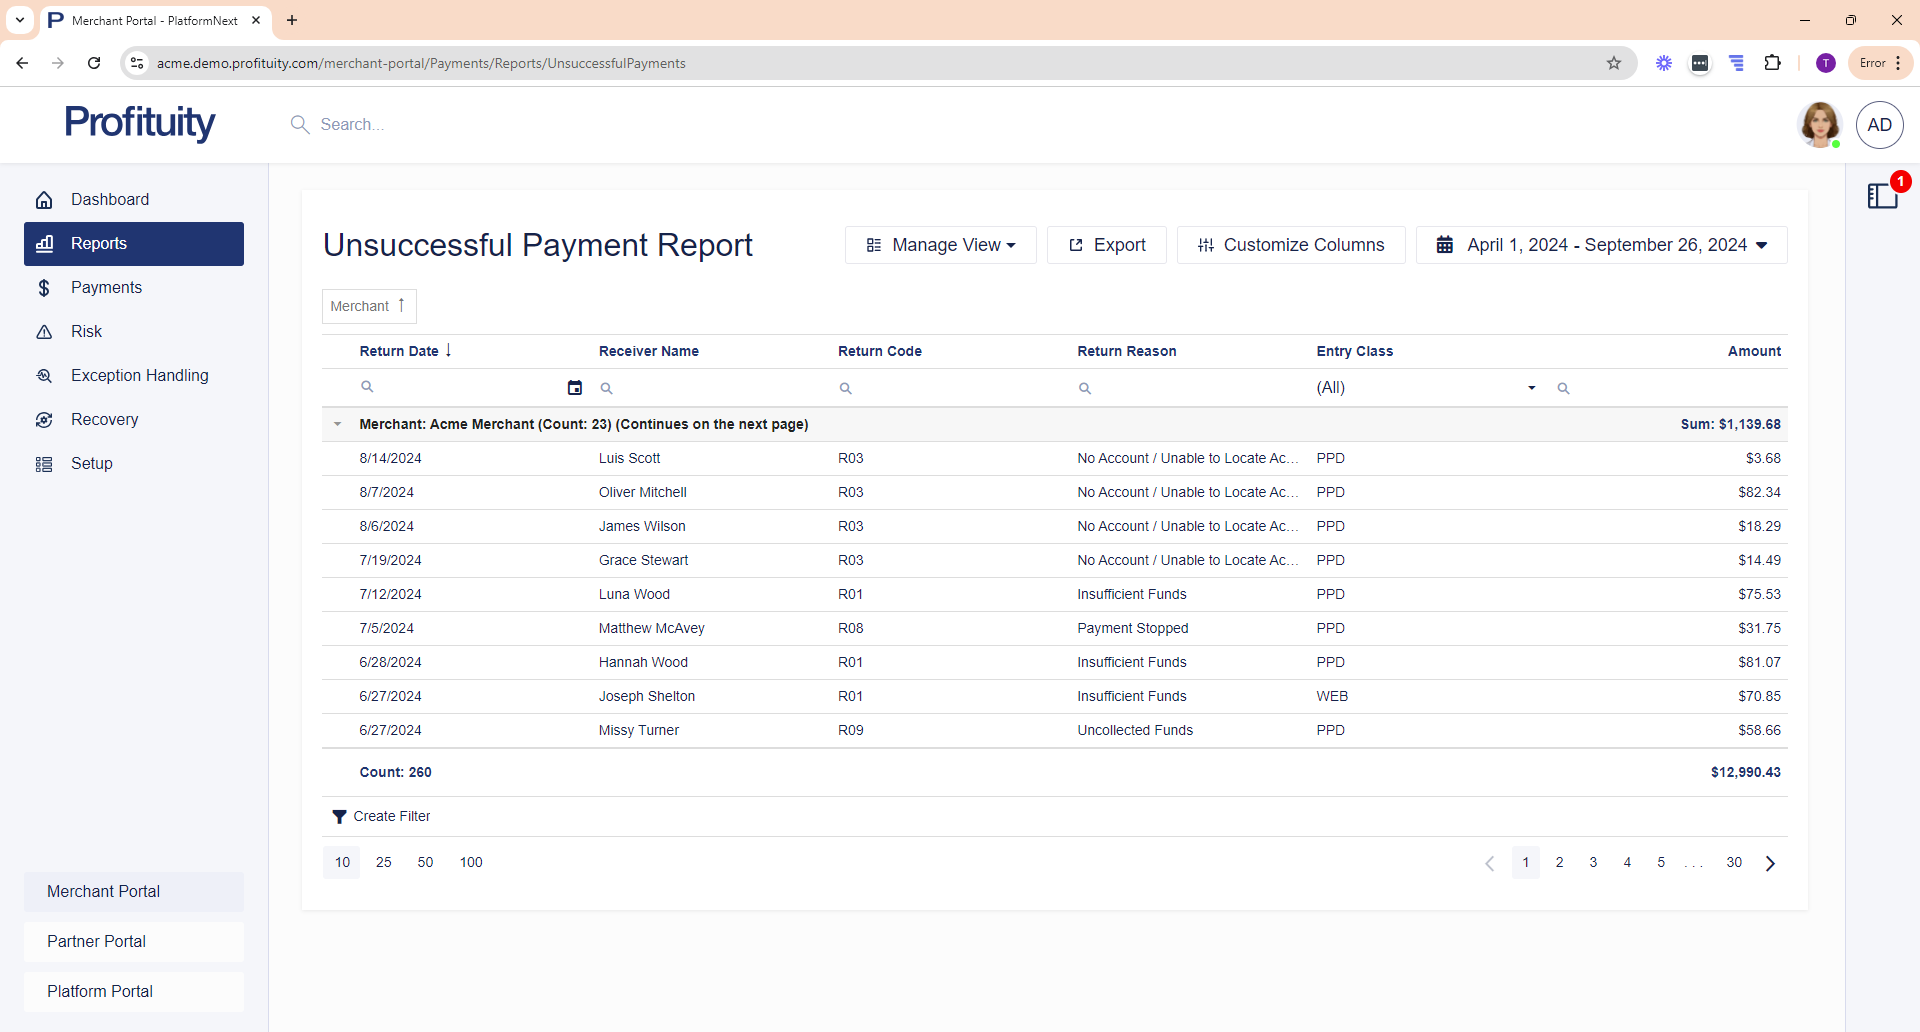
Screenshot: Unsuccessful Payment Report
Recovery Reports
Recovery Item Summary
The Recovery Item Summary report provides you with a summary view of your recovery item activity grouped by Merchant. By default, the last 30 days is shown.
You can click the arrow on the side to expand/collapse the details.
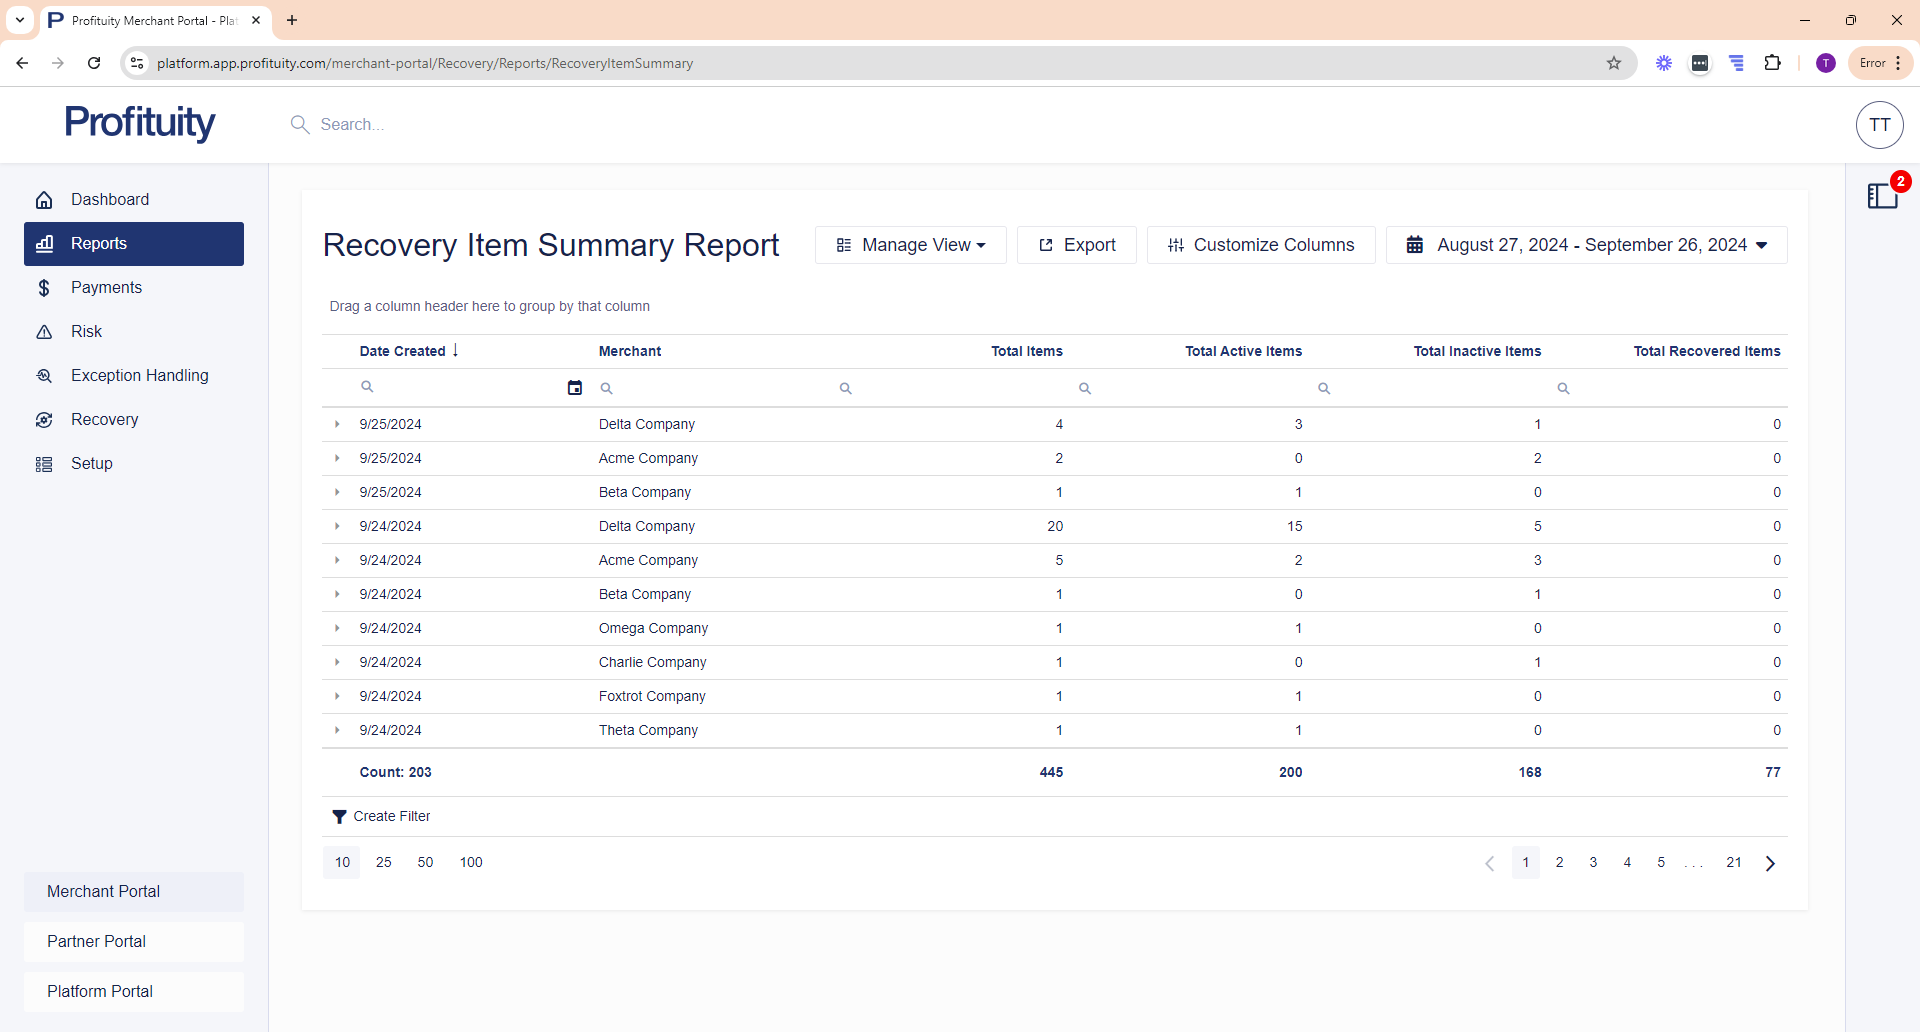
Screenshot: Recovery Item Summary Report
Risk Reports
Return Percentages
The Return Percentage report provides you with a summary view of your return item activity grouped by Merchant. By default, the last 60 days is shown.
You can click the arrow on the side to expand/collapse the details.
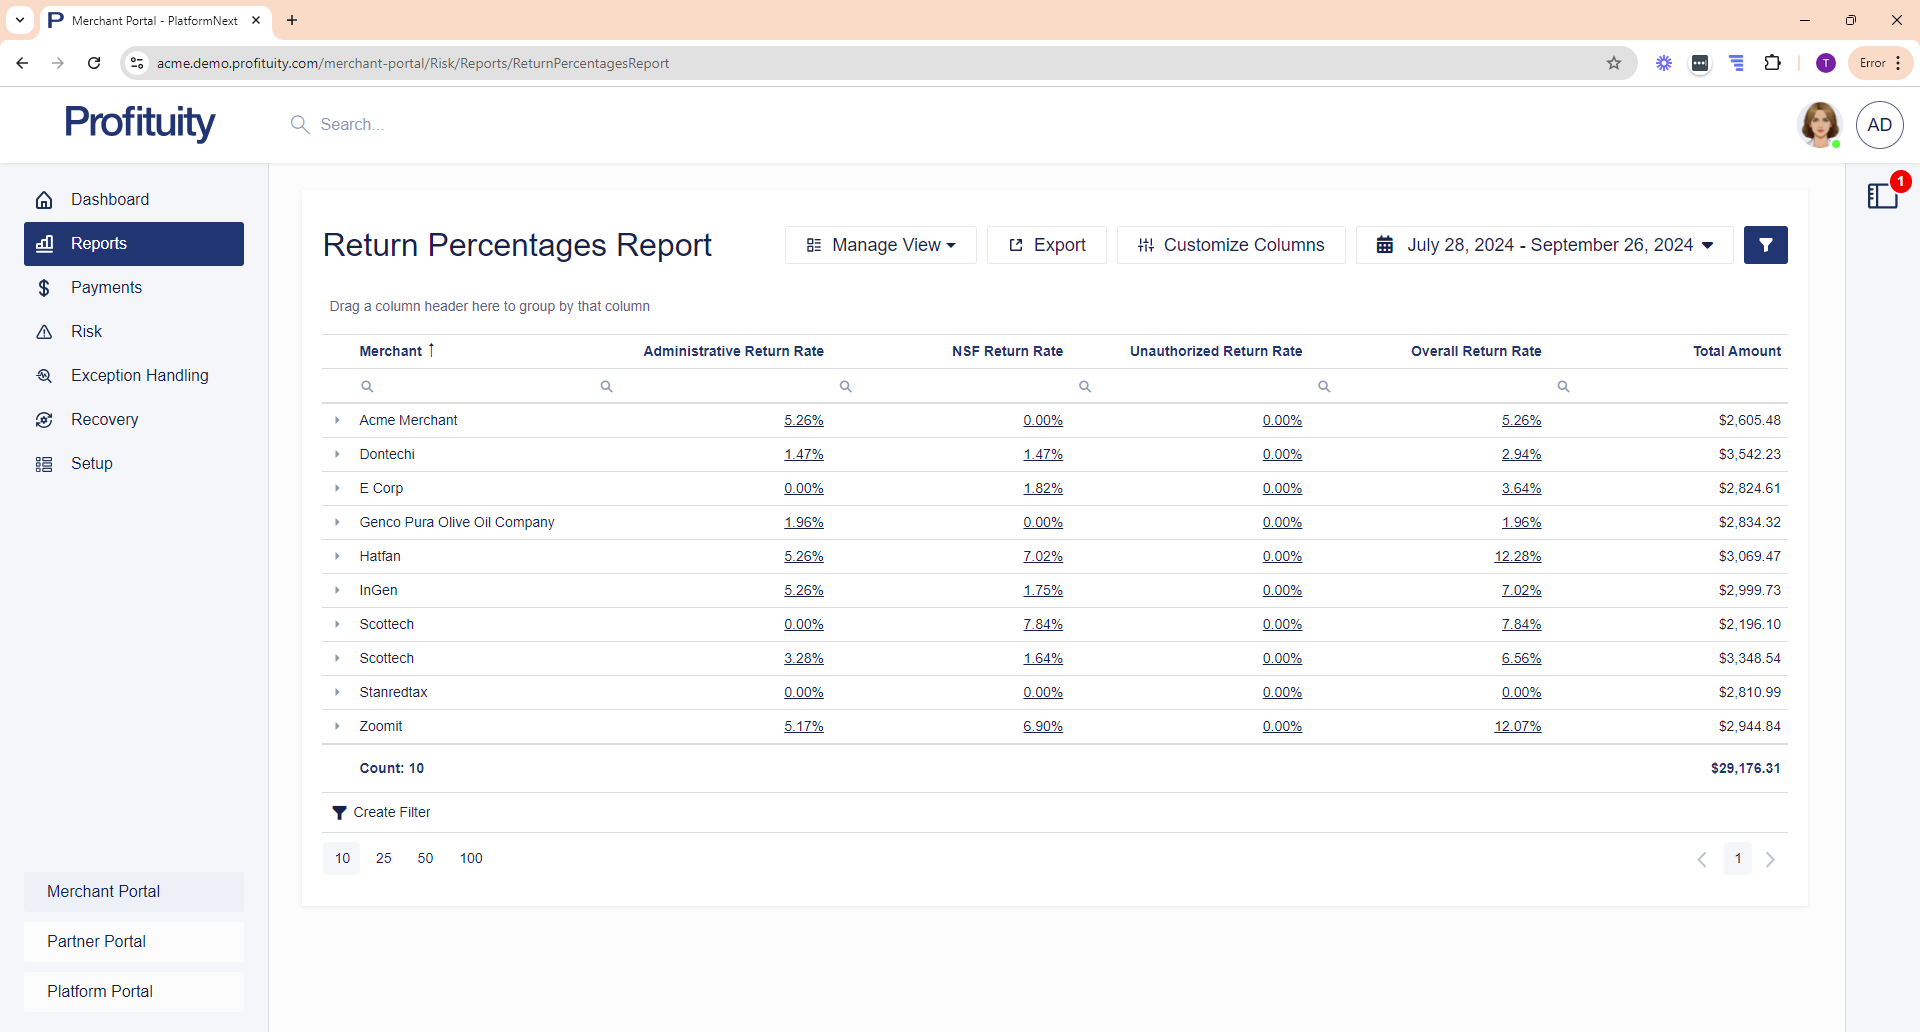
Screenshot: Return Percentages Report
Payments
Customers
The Manage Customers area is where you go to manage your customers. You can create, edit, view, clone, or delete a customer.
Customers can be associated with Payments and Payment Templates. It can be used to store information about the associated customer (such as the address, phone number, and email information).
Payments
In the Profituity ecosystem, a 'Payment' refers to a transaction initiated by a Merchant, which can either be a 'debit' or a 'credit'. A 'debit' is an operation to withdraw funds from a customer's account, while a 'credit' adds funds back.
The Manage Payments area is where you go to manage your submitted payments. You can create, edit, view, clone, or delete a payment. Refer to: Merchant Portal > Payments Section.
While a payment is still Pending, you can Edit or Cancel it should you need to. Refer to: How-to: Cancel a Payment (Merchant Portal).
Payments with a status of Potential Duplicate should be reviewed immediately and verified whether they are an actual duplicate. Payments that have a status of Potential Duplicate will not be processed.
Refer to Payment Statuses for an explanation on the various payment statuses.
Payment Templates
The Payment Templates section is where you can go to create and manage payment templates. You can create, edit, view, clone, or delete a payment. Refer to: How-to: Create a Payment Template (Merchant Portal).
A payment template is a defined configuration that can be used for the creation of payments in two ways:
It can store the payment related information to later be referenced when creating a payment via the API or from a Payment File.
It can be used to set up a recurring payment plan. In this scenario, the payment template would contain a payment schedule that defines when the system should automatically create future payments.
Import Files
The Import Files section is where you go to upload your payments that were created outside of the system or where you can import customer records. Refer to: How-to: Import a Payment File (Merchant Portal) or How-to: Import a Customer File (for payments) (Merchant Portal).
Risk
Bank Account Validations
The Bank Account Validation section is where you can go to validate bank accounts. Refer to: How-to: Validate Bank Account Information (Merchant Portal).
Exception Handling
Administrative Returns
The Administrative Returns area is where you go to manage your Administrative Returns if you have been configured with access to do so. Refer to: How-to: Correct Administrative Returns (Merchant Portal).
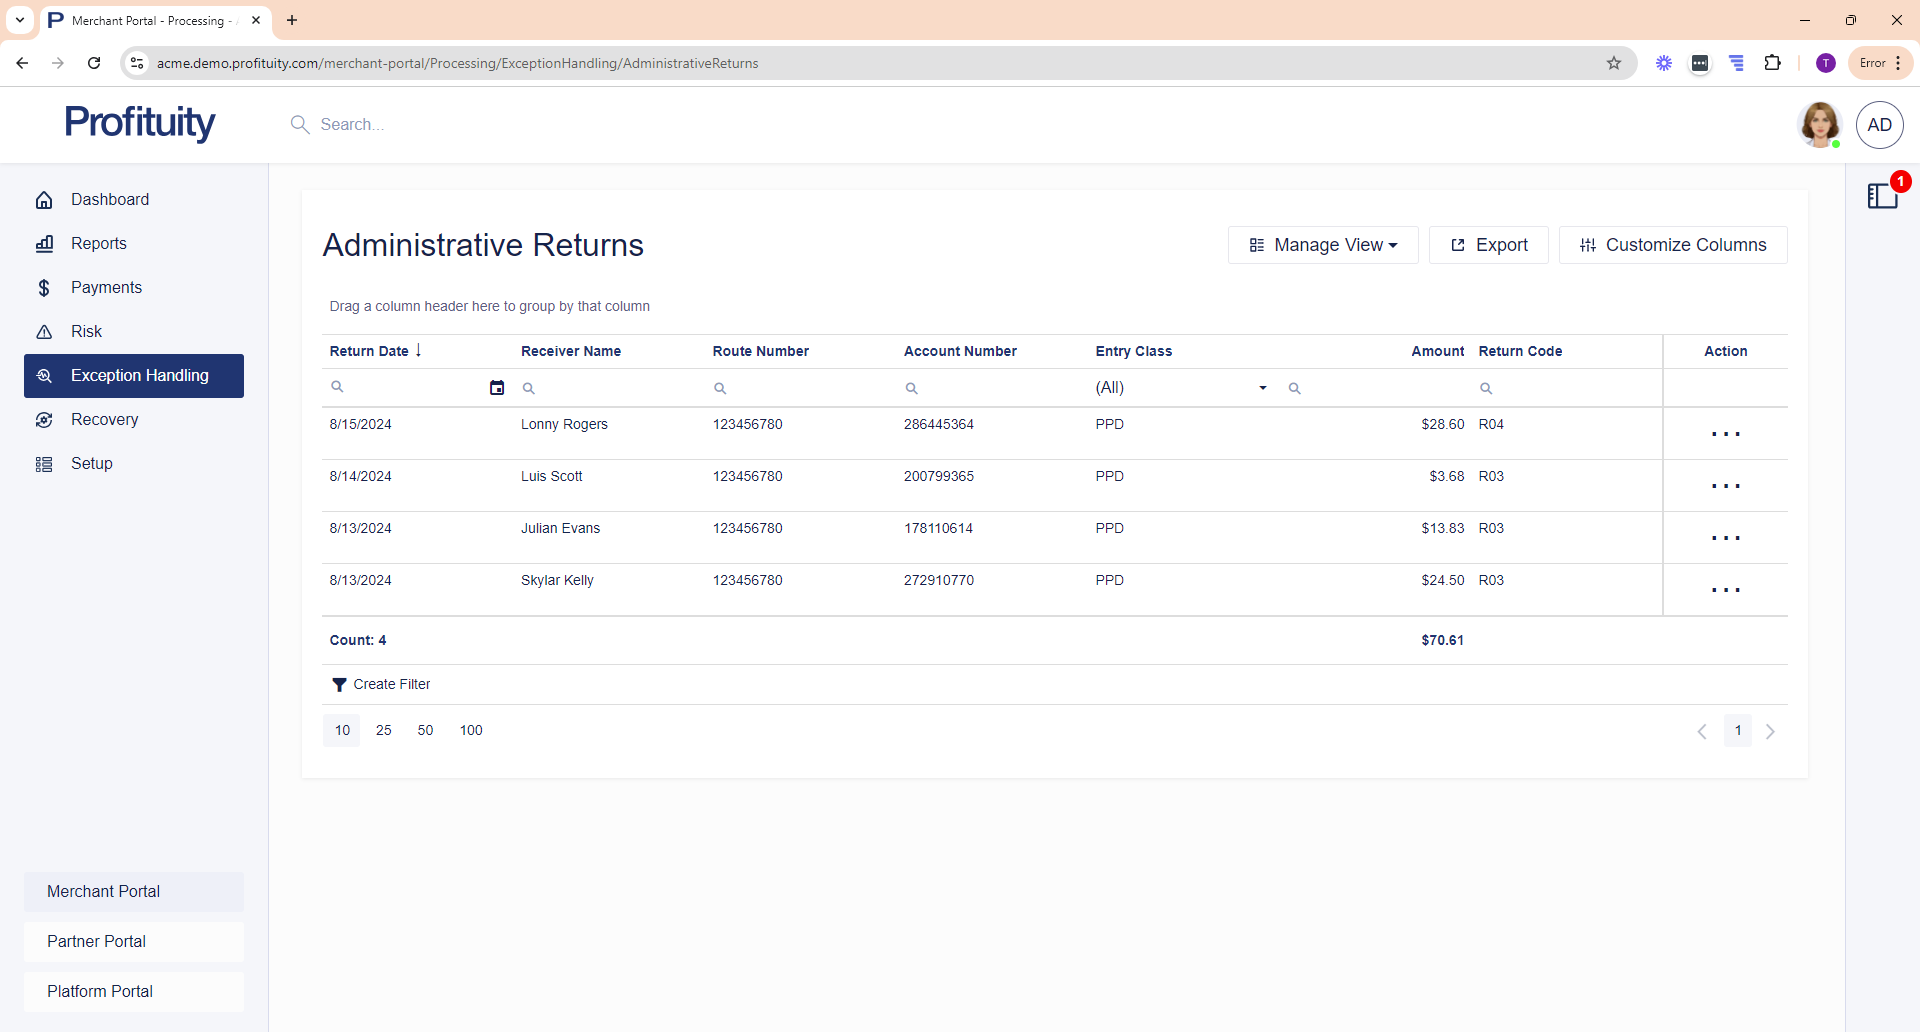
Screenshot: Administrative Returns
Recovery
Customers
The Manage Customers area is where you go to manage your customers. You can create, edit, view, clone, or delete a customer.
Customers can be associated with Recovery Items. It can be used to store information about the associated customer (such as the address, phone number, and email information).
Recovery Items
A recovery item can be a returned payment or a returned check/ACH transaction that was processed outside of the system and is being processed for recovery. Refer to: Merchant Portal > Recovery Section.
Not all items are eligible for re-presentment. According to NACHA rules, only items returned for specific reasons, such as non-sufficient funds (R01) or uncollected funds (R09), can be re-presented. Additionally, items older than 180 days are not eligible for re-presentment.
Manage Batches
The Manage Batches section is where you go to complete your data entry on the checks that you scanned with the Imaging Utility or recovery items that you uploaded via the Import File area.
Import Files
The Import Files section is where you go to upload your recovery items that were created outside of the system or where you can import customer records. Refer to: How-to: Import a Recovery File (Merchant Portal) or How-to: Import a Customer File (for recovery items) (Merchant Portal).
Setup
Users
Merchant portal users who have the User Admin permission can create new users to help manage their accounts. Refer to: Merchant Portal > Setup Section.
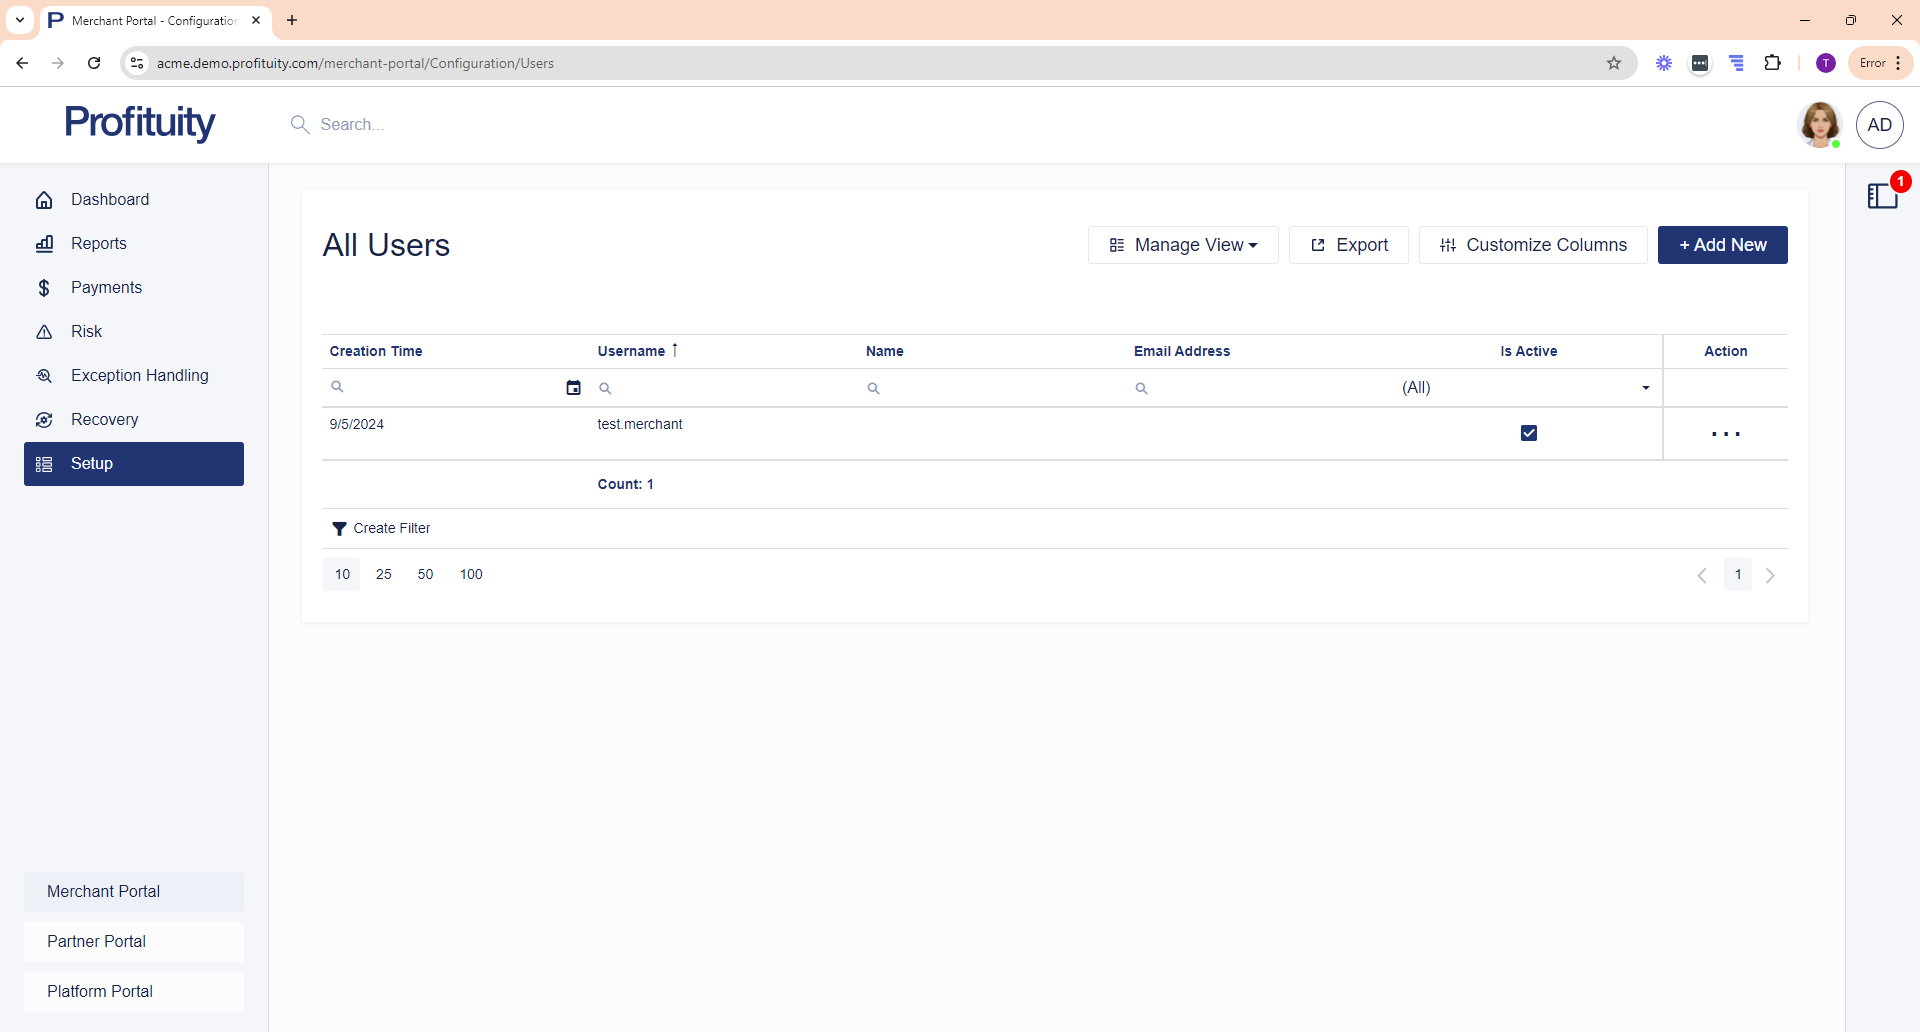
Screenshot: Users
MyView Menu
Most grids include a MyView Menu. This allows you to save custom grid configurations that you can view at any time. Refer to: MyViews.
Screenshot: MyView Menu